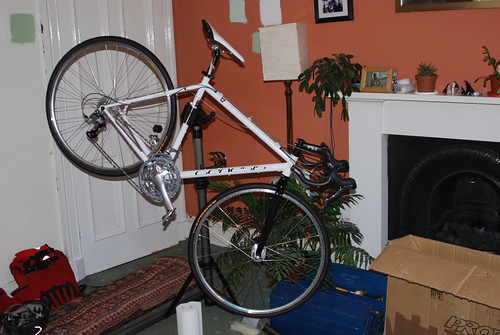
So measurements have been taken, the wish list drawn up, then the bits bought, the wheels built, and now comes the part we have all been waiting for: putting it all together! Yes, my new mostly new (apart from the frame forks and bottom bracket) bike project has reached the build phase. Now if, like me, you have never actually built a bike from scratch before, there are three ways in which to approach this phase:
a) get a bicycle shop to build it for you. What! I have already spent enough on this bike to buy a new one outright (OK, but not one with these components).
b) watch videos on-line and surf a few cycling forums to get advice on how to do it. Yes, this is a steep learning curve but it should be do-able, although it may take a little longer and you may have to sort through contradictory advice on what to do when things go wrong.
c) marry a spouse who has a relative who is an experienced bike builder, then invite him over on holiday to help you with the build, should someone give you a redundant Genesis Croix de Fer 09 frame-set. This solution either requires extreme forethought and devious planning, or a great deal of luck, the latter in my case.
As I say above, building a bike from scratch involves, if you have never done it before, a steep learning curve. First up, how to fit a headset? There are two techniques for doing this, either use a collection of expensive headset fitting tools or, if you don’t have one to hand, gently tap the headset into the frame with a hammer. Well, we didn’t have a headset press or crown race setting tool, etc., to hand, so we started with the second technique and got the crown race onto the forks. However, the cups were a bit tight and we decided that discretion was the better part of valour, and took it to the bicycle repair man down the road and got him do it.
Another of the early lessons for me was that parts which have been discounted heavily might not have sold well for a reason. For instance, the 3T Bio Morphe Handlebars, could it be these were less than popular because it is an absolute sod to fit Shimano STi’s to them? The band on the STi’s doesn’t allow for a lot of adjustment, and so getting it past the Bio Morph bits is rather difficult. I suspect that 3T, being Italian, would respond to this by suggesting that I should have used Campagnolo, but I don’t know because I haven’t actually asked them.
Next step up the learning curve, do your homework carefully before buying the parts on-line. Knowing that Avid BB 7 are available for road bikes is not enough, as when you do a Google search, you might find yourself on a web page from an internet retailer offering “Avid Ball Bearing 7 Mechanical Disc Brakes” at a very good price, but not saying if they are road or mountain bike (Chain Reaction Cycles expect you to know what you are looking for). Knowing that there is a difference will save you from the embarrassing experience of bolting your shiny new disc brake calliper onto the frame, only to spot that it has “MTB” written on it. It also saves you the frustration of waiting several days for the new parts to arrive, but this does give you time to start writing a blog post.
Even if you don’t have the brakes, there are still other things to get on with, such as fitting the cranks and setting up the gears. I hadn’t bothered to replace the bottom bracket, as the one that was there was suitable for the crank-set I had in mind. However, as the pedals were turned over for the first time, the gentle grinding noise reminded me of the last thing Steven had said to me when he gave me the frame, “… the bottom bracket’s a wee bit worn and probably needs replacing.” Doh, why hadn’t I remembered that before now? Next came the dérailleurs. As I had decided to go for a triple chainset rather than the double which came with it, I had given the old dérailleurs to the Bike Station, without first removing the spacer inside the band on the front dérailleur. Cue a trip to the Bike Station to try and recover it, fortunately they hadn’t yet used the bits I had given them, and we were able to get it back. Phew.
Putting the wheels on prompted a discussion on tyres and tubes. My choice of Continental Ultra Gatorskin 700×28 was considered a reasonable one, but Continental GP 4 Season 700×28 would probably be better, as they would save around 70g per tyre. As for the inner tubes, well the cheapo Airwave ones are, by my own admission, a poor choice. They are really heavy and the one place where saving weight on a bike really makes a difference is the wheels, as the lower rotation mass makes it easier to do things like accelerate and steer. So something like Schwalbe SV20 extra light inner tubes would have been a better choice, as this would save another 100g per wheel. OK, they are intended for 18-25mm tyres, but they can be used with 28mm tyres, you just have to top them up a wee bit more often.
Addendum: after a four day wait, a package from Planet X Bikes (not the cheapest but they had the road disc brakes in stock) finally arrived, but my excitement was short lived when I found they had sent me only one. A quick check of the delivery note showed that I had indeed ordered two, and a phone call confirmed there had been a picking error. So at the time of writing I have yet to finish the build and take the bike out for a test ride.
Next: Bike build project (part 6): Finishing off and finally riding the thing!

Friday, 10th, September 2010 at 16:02
This is where it gets exciting. I agree on the steep learning curve: I was fortunate that I worked in the local bike shop when I built Michi’s bike.
I’m not sure changing the tyres to save weight would make much sense for me though: if I want to reduce 70g of weight all I need to do is throw out all the stuff I’ve dumped in the Xtracycle.
Friday, 10th, September 2010 at 19:43
Aye it’s been a steep learning curve, but fun and well as frustrating 😉
Changing the tyres and tubes would save 170g per wheel which would make acceleration quicker and steering at speed, but then again if you have a Xtracycle or any other cargo bike, these are really priorities. I would love to have a cargo as well, but sadly there is storage problem with the bikes we already have in our 3rd floor flat…